
Now, imagine waking up early in the morning, all groggy and grumpy. You stumble to the shower and get ready for work. Before I step out of the door I have to unlock the charge port on my Tesla Model 3.. every morning I have to stand just outside my front-door, phone in my hand.. waiting for the Tesla app to start, wake up the car and unlock the charge port.
Seems like a waste, doesn’t it? So I figured, why not create a simple button that does all of that while I lock the door and walk the three steps to my car. So that’s what I did. I use C# in my day job so I figured why not give .NET CORE a try on the Pi.
This tutorial describes a few different steps, so feel free to skip whatever you already have or is not needed in your use-case:
- Install Raspberry Pi OS (previously Raspbian) on an SD-card with a Windows machine
- Configure SSH and WiFI so you don’t need to connect a screen, mouse and keyboard
- Connect with SSH
- Install .NET CORE 3.1
- Create a ‘Hello World’ .NET CORE Console application and deploy it to the PI
- Create a service to keep the console application running forever and ever
This guide doesn’t teach you how to connect a button to your PI and perform REST requests to the Tesla servers though..
Required stuff
- A Raspberry Pi ;). Please note that .NET CORE doesn’t work on the Pi 1 series and the Pi Zero (which I found out after ordering one…..). Click here for more info on that.
- A SD-card
Install Raspberry Pi OS on an SD-card
The first thing we need to do is prepare our SD card with an operating system. I am going to go with the Raspberry Pi OS.
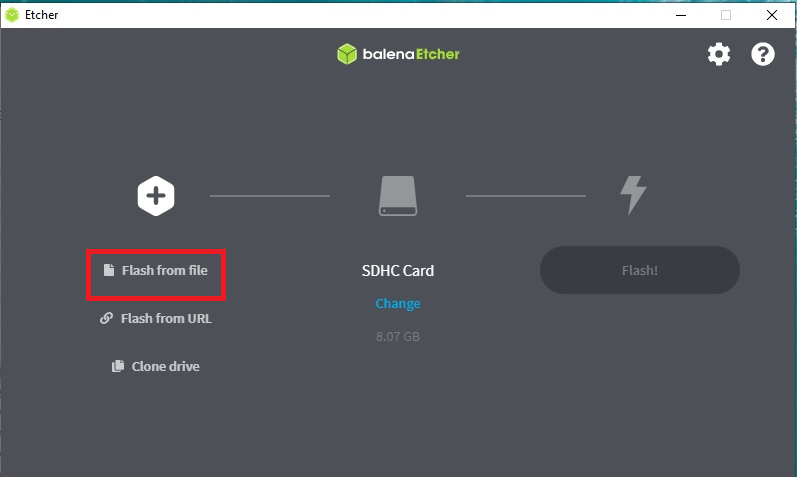
Step 1 – Download BalenaEtcher:
You need a tool to flash the ISO to your SD card. Since I am on Windows, I will use BalenaEtcher, download it here!
Step 2: – Download Raspberry Pi OS:
Download Raspberry Pi OS.
I actually unzipped the Pi OS, because BalenaEtcher gave me a blank screen during the flashing process when I tried it without..
Step 3:
Install BalenaEtcher, start it and click on the Flash from file button. Then select the Raspberry Pi OS ISO and press Flash!
Configure SSH and WiFi
Since I did not want to get up from my chair and search for a loose keyboard, mouse, hdmi cable, adapter and what not, I just preconfigured SSH and WiFi!
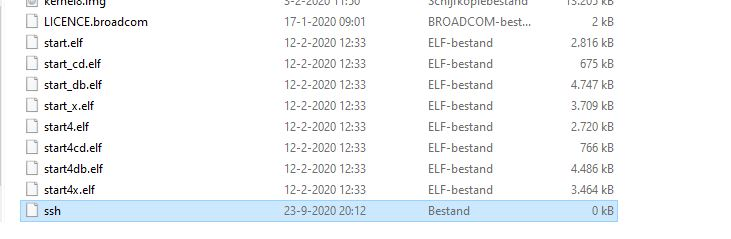
Step 1 – Configure SSH:
To allow a SSH connection to your Raspberry Pi, just add an empty ssh file to the root directory of your SD-card. Just an empty file without a file extension.
Step 2 – Configure WiFi:
If your Pi doesn’t have WiFi or you want to use the Ethernet port, just skip this step..
Create another file in the root of your SD-card, called wpa_supplicant.conf and add the following contents:
ctrl_interface=DIR=/var/run/wpa_supplicant GROUP=netdev
update_config=1
country=«your_ISO-3166-1_two-letter_country_code»

network={
    ssid="«your_SSID»"
    psk="«your_PSK»"
    key_mgmt=WPA-PSK
}
Enter the country code (can be found here). I am from the Netherlands, so my code is nl.
Also enter your SSID name and your WiFi password.
That’s it, you are now ready to put the SSD card in the Pi and boot it.
Connect with SSH
For the next few steps we need to execute various commands on our Pi, so let’s connect with SSH. This is fairly simple because we were smart enough to set-up WiFi beforehand.
Download a SSH connection tool, for example Putty.
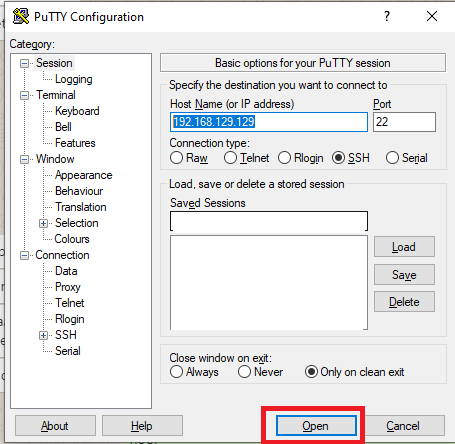
Figure out the IP that was assigned to your Pi. I logged in on my router and noticed a new device with IP 192.168.129.129. That must be my Pi.
Enter the IP in Putty and press Open:
A prompt opens and you will be asked for your Username, enter “Pi”. Then enter “raspberry” as password. follow the instructions on screen to change the default password ;).
Install .NET CORE 3.1 on your Pi
The next step is to install .NET CORE on the Pi! Since we are going to create our application with Visual Studio on your PC, there is no need to install a SDK on your Pi.. you only need the runtime.
You can find the latest version here: https://dotnet.microsoft.com/download/dotnet-core/3.1
Copy the download link from the ARM32 download text under the .NET Core Runtime section.. The latest version for me is 3.1.7. Now we need to wget this on our Pi.
Step 1 – download the runtime
Execute the wget command with the URL you just copied on your Pi (in the Putty session).
wget https://download.visualstudio.microsoft.com/download/pr/3f331a87-d2e9-46c1-b7ef-369f8540e966/2e534214982575ee3c79a9ce9f9a4483/dotnet-runtime-3.1.8-linux-arm.tar.gz
Step 2 – unzip the files in a folder
Execute the following command (don’t forget to enter the correct version filename) to create a dotnet-arm32 folder in the root of your Pi and unzip the runtime to it:
mkdir $HOME/dotnet-arm32
tar zxf dotnet-runtime-3.1.8-linux-arm.tar.gz -C $HOME/dotnet-arm32
Step 3 – allow the ‘dotnet’ command to be run from anywhere in the system
export DOTNET_ROOT=$HOME/dotnet-arm32
export PATH=$PATH:$HOME/dotnet-arm32
Step 4 – Add the export records to the .bashrc file to make the dotnet command persistent through reboots
nano /home/pi/.bashrcAdd the export records to the bottom of the file, press ctrl +x and then y, and then enter to save.
Create a hello-world demo application
I am going to assume that you have Visual Studio installed with the .NET CORE SDK on your PC.
Step 1 – Create a .NET CORE Console Application in Visual Studio (2019)
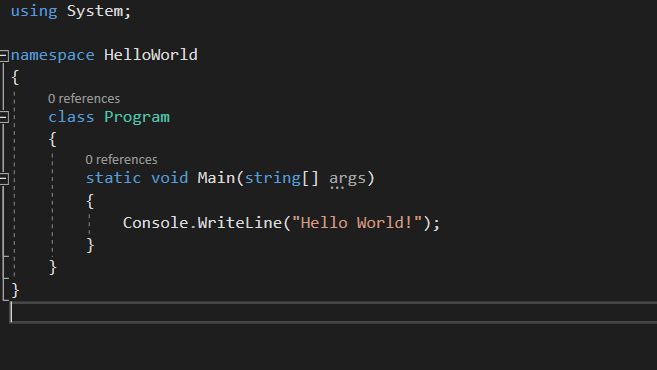
There it is, beautiful! Now, let’s make a few modifications to it so that we can later on run it as a service in the background.
Step 2 – Modify the code a bit
        static async Task Main(string[] args)
        {
            var hostBuilder = new HostBuilder()
            .ConfigureAppConfiguration((hostContext, configBuilder) =>
            {
            })
            .ConfigureLogging((hostContext, configLogging) =>
            {
            })
            .ConfigureServices((hostContext, services) =>
            {
                Console.WriteLine("Hello World!");
            });

            await hostBuilder.RunConsoleAsync();
        }
You need to install the Microsoft.Extensions.Hosting NuGet package for the HostBuilder.
Step 3 – Publish the application
Go to the “Build” menu-item and press “Publish HelloWorld”.
Create a new Folder publish profile and after saving, press the edit text to edit the profile.. Select the following:
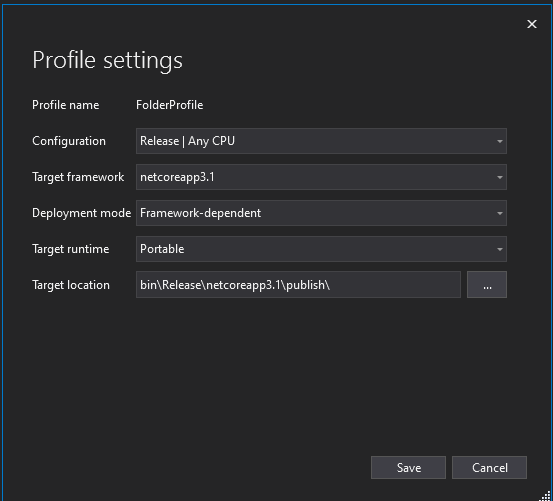
Press the Publish button!
Publish the console app to our Pi
Alright, now that we have our demo application, we need to publish it to our Pi.
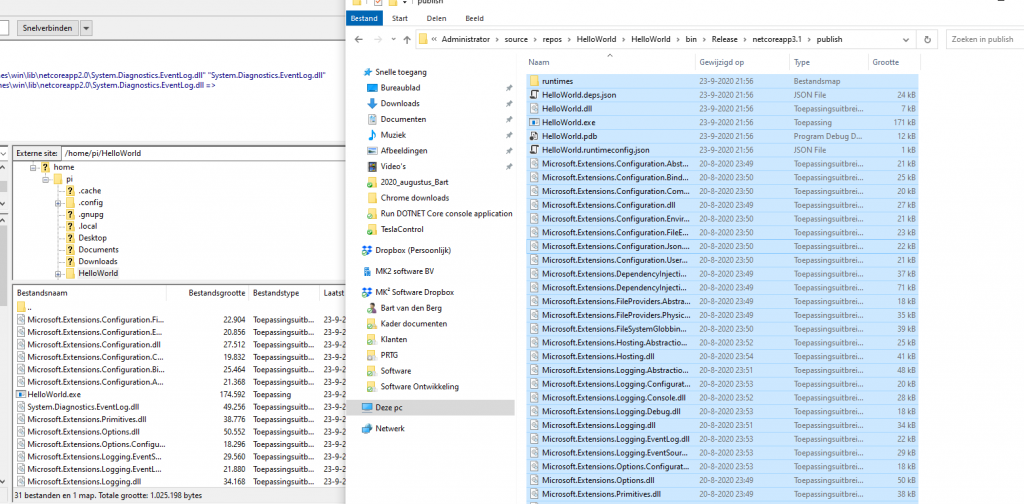
Step 1 – Navigate to the published files folder of your HelloWorld project
Navigate to the Visual Studio project root path and then to the ‘\bin\Release\netcoreapp3.1\publish\’ folder.
Step 2 – Connect to your Pi with Filezilla (or another FTP client)
The easiest way to get the files on your Pi is with FTP. I use Filezilla client, but any will do.
Connect with the following details:
Host: sftp://{your_pi_ip_address}, in my example: “sftp://192.168.129.129”
Username: Pi
Password: the default password is ‘raspberry’, but you have changed that by now of-course.
Create a new folder in the ‘/home/pi’ part of your Pi. For example: “HelloWorld”.
Step 3 – Copy the published files to the HelloWorld folder
Lets switch back to Putty and test it out.. cd yourself to the ‘HelloWorld’ folder and enter:
dotnet HelloWorld.dllYou should see the following:

So we now have a .NET CORE Console application running on our Raspberry Pi!
The final step is to run the ‘HelloWorld’ application as a background service so that it will keep running after we restart our Pi.
Create a service to keep the console application running
Create a new file on your PC, named ‘HelloWorld.service’, and paste the following content:
[Unit]
Description=Hello world
After=network.target

[Service]
Type=forking
WorkingDirectory=/home/pi/HelloWorld
ExecStart=/home/pi/dotnet-arm32/dotnet /home/pi/HelloWorld/HelloWorld.dll
StandardOutput=inherit
StandardError=inherit
Restart=always
RemainAfterExit=yes
User=pi

[Install]
WantedBy=multi-user.target
So, I am not entirely sure what everything in this file even is or does.. it does however contain the path to the dotnet-arm32 folder and to our HelloWorld.dll.
Copy the file to the ‘/home/pi’ folder on your Pi with Filezilla and execute the following commands:
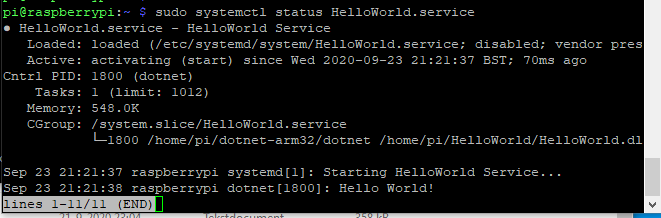
sudo cp HelloWorld.service /etc/systemd/system/HelloWorld.service

systemctl daemon-reload

sudo systemctl enable HelloWorld.service

sudo systemctl start HelloWorld.service

sudo systemctl status HelloWorld.service
This copies our service to the appropiate folder, reloads the services daemon and then adds the HelloWorld service, and finally displays the service status! It should look something like this:
That’s it! You’ve installed your Pi from start to end, created a .NET Core Console application, deployed it to the Pi and added it as a service! How cool is that ;)?
4 comments
Amazing article. Thank you! I was able to get my own application running on a Pi.
I’ve only encountered an issue with the service configuration file. When I used “Type=forking” systemctl would get “stuck” once I ran systemctl start myservice.service and I had to break out via CTRL-C. The service would continue though. After I’ve changed the type to simple it works like other services do. Any idea?
Thanks,
Stefan
Hi Stefan, I believe it appears stuck because you are actually ‘watching’ the service run. When you break out of it with ctrl + c, the service should still be started and running in the background. If you restart your Pi after that, let it reboot and then check the status with “sudo systemctl status HelloWorld.service” you should still see that the service is running! In other works, I believe it is normal that you see it hanging when running the start command.
Let me know if that doesn’t work properly, I will check it on my Pi!
Outstanding article. I’m new to RPi/.NET development and your article was the most accurate and informative of the the scores of articles and videos I have discovered. Thank you for the taking the time and making the effort to write this up. I really appreciate what you’ve done.
Hi Jim,
Thank you very much for your kind words, glad the article helped you. :)!
Bart