In this tutorial, I will walk you through the process of setting up a Azure DevOps pipeline that allows you to distribute your .NET packages within your organization as a NuGet package. Using NuGet packages offers several benefits:
- Dependency Management: NuGet simplifies the process of managing dependencies in your projects. Instead of manually downloading and integrating libraries or frameworks, you can easily add NuGet packages, ensuring that your projects have the necessary components to function properly.
- Code Reusability: NuGet packages enable code reuse across projects and teams. By packaging and distributing reusable code as NuGet packages, you can reduce duplication and save development time. Teams can focus on creating high-quality code without reinventing the wheel for common functionalities.
- Version Control: NuGet allows you to track and manage different versions of packages. This ensures that your projects can rely on specific versions of packages, avoiding compatibility issues or unintended breaking changes introduced by new versions.
- Collaboration and Standardization: NuGet packages promote collaboration and standardization within your organization. By sharing common libraries, frameworks, or custom-built components as packages, teams can align on best practices, reduce inconsistencies, and ensure consistent quality across projects.
Configure your project
Add the following properties to your .csproj:
| Property | Description |
| PackageId | The case-insensitive NuGet package identifier, which must be unique across nuget.org or whatever gallery the NuGet package will reside in. IDs may not contain spaces or characters that are not valid for a URL. |
| Authors | Comma separated list of package authors. |
| Version | Numeric value of the version in the format major.minor.patch (e.g. 1.3.6) |
| Company | Company name for the assembly manifest |
| Product | Product name information for the assembly manifest |
| IsPackage | Indicates whether the project can be used to create a NuGet package. |
| Description | A long description of the NuGet package for UI display. |
The should .csproj now looks something like this:
<Project Sdk="Microsoft.NET.Sdk">

	<PropertyGroup>
		<TargetFramework>net7.0</TargetFramework>
		<ImplicitUsings>enable</ImplicitUsings>
		<Nullable>enable</Nullable>
		<PackageId>DocuBear.ExamplePackage</PackageId>
		<Authors>DocuBear</Authors>
		<Version>1.0.0</Version>
		<Company>DocuBear</Company>
		<Product>DocuBear.ExamplePackage</Product>
		<IsPackable>true</IsPackable>
		<Description>This is an example description!</Description>
	</PropertyGroup>

</Project>
Setup/configure a feed in Azure Devops
Azure DevOps Artifacts feed is a centralized repository in Azure DevOps for storing and managing software artifacts like NuGet packages, npm packages, Maven packages, and container images, facilitating secure sharing and distribution.
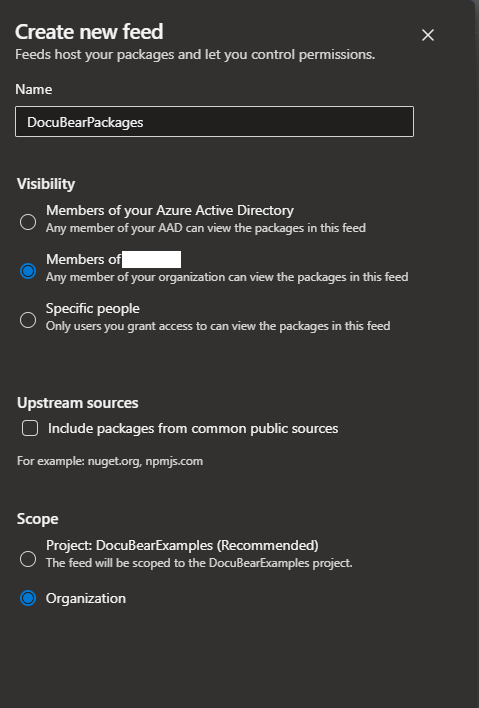
Navigate to your project in Azure DevOps. Go to “Artifacts” in the menu on the left. Click on the “Create Feed” button.

Click on the “Create Feed” button

Scope
For more information about the difference between Project and Organization scope:
https://learn.microsoft.com/en-us/azure/devops/artifacts/feeds/project-scoped-feeds?view=azure-devops
Setup your Azure Devops pipeline
trigger:
- main

pool:
  vmImage: 'ubuntu-latest'

variables:
  buildConfiguration: 'Release'

steps:
- task: DotNetCoreCLI@2
  displayName: 'dotnet build'
  inputs:
    command: 'build'
    arguments: '--configuration $(buildConfiguration)'
    projects: 'src/DocuBear.NuGetExample/DocuBear.NuGetExample.csproj'

- task: DotNetCoreCLI@2
  displayName: "dotnet pack"
  inputs:
    command: 'pack'
    arguments: '--configuration $(buildConfiguration)'
    pack-agesToPack: 'src/DocuBear.NuGetExample/DocuBear.NuGetExample.csproj'
    nobuild: true
    versioningScheme: 'off'

- task: NuGetCommand@2
  displayName: 'nuget push'
  inputs:
    command: 'push'
    feedsToUse: 'select'
    pack-agesToPush: '$(Build.ArtifactStagingDirectory)/**/*.nupkg;!$(Build.ArtifactStagingDirectory)/**/*.symbols.nupkg'
    nuGetFeedType: 'internal'
    publishVstsFeed: 'DocuBearPackages'
    versioningScheme: 'off'
    allowPackageConflicts: true
Change the value in publishVstsFeed (in the last step) to the feed name as you entered in the previous step.
The provided Azure DevOps pipeline configuration performs the following tasks:
- DotNetCoreCLI task
Executes the “dotnet build” command for the specified project, using the provided build configuration. - DotNetCoreClI task:
Performs the “dotnet pack” command to create a NuGet package for the specified project, using the provided build configuration. - NuGetCommand task:
Pushes the NuGet packages created in the previous step to a NuGet feed.
Selects specific packages to push based on the file path pattern.
Uses an internal VSTS feed named “DocuBearPackages” for publishing.
Disables versioning scheme by setting “versioningScheme” to ‘off’.
Allows package conflicts if encountered during the push.
Overall, this pipeline builds the specified project, creates a NuGet package, and pushes it to an internal VSTS feed for further consumption or distribution.
If you run the pipeline the first time you will likely get an error like this:
User ‘xxx-xxx-xxx’ lacks permission to complete this action. You need to have ‘ReadPackages’. This is because the Build Service used does not have permission on the feed.
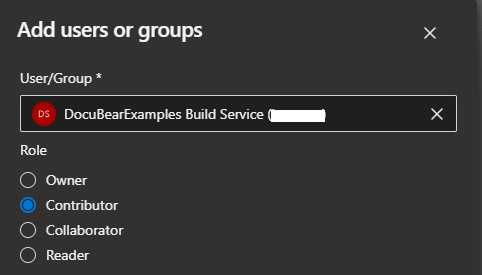
Navigate to the feed you created (Via Artifacts -> Gear wheel -> Permissions tab)

Click on the “Add users/groups” button. Make sure you add the [ProjectNameHere] Build Service (organization name) user with the Contributor role.

After you have done so (re)run the pipeline. The package should now be successfully deployed to your private NuGet feed.


1 comment
[…] Azure DevOps – Build & deploy NuGet package to private feed […]